Data in cloud and triggers
Connect the panel in Adafruit IO with a trigger in IFTTT.
In order to be able to use the full capabilities of Adafruit IO, it is necessary to get acquainted with the documentation of the services that the cloud structure offers. In this case we will use the integration of Adafruit IO with the IFTTT platform. IFTTT offers the ability to connect our information channels and data in Adafruit IO to the rest of the Internet without having to write code. We can send email notifications, interact with smart devices or post a message on Twitter, use Google assistant and much more. We offer the opportunity to write our own applets, for purposes that are specific and necessary only for us.
Connecting to IFTTT allows you to download data from Adafruit IO feeds to the rest of the Internet or move data from the network to our Adafruit IO account.
IFTTT registration
To do this, we need to select "Services / IFTTT" from our Adafruit IO account. On the newly appeared page, select "Click here to connect". This will take us to the IFTTT registration page. If you are registered on Facebook or Google, you can also use them. After registering, you need to log in to the newly created account.
We can now connect our data in Adafruit IO, from the "touchsensor" panel with a trigger in IFTTT. The IFTTT will check the data from this sensor and will react if there is a critical event.
Creating a trigger in IFTTT
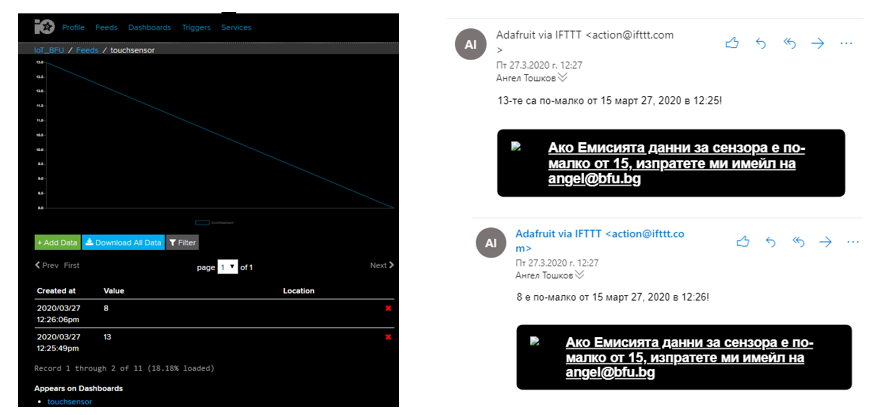
Let's create a trigger to send us an e-mail with a message, provided that the value received from our IoT_BFU sensor is less than 15. Recall that the sensor sends data to the panel "touchsensor" at values of -smaller than 20.
We must first look for a similar ready-made trigger. From the "Explore" button, which is located next to the icon for managing the parameters of the account, we can enter the mode - search for a suitable trigger. In the search box, enter "Adafruit" to display triggers for connection to the cloud structure and start looking for a suitable trigger. We can use for example this "If a feed value limit is reached, email me the details". Once selected, we need to connect IFTTT and Adafruit IO with "Connect". If the connection is successful, we need to set the trigger.
Feed - touch sensor; Relationshep - less than; Value - 15 then save the settings.
If we now return to the "Home" page of the account and select Adafruit, we will enter the contact page for Adafruit IO, where we should see the newly created trigger. Its status must be "Connected".
A trigger has been created to send us an e-mail with some message
Test work IoT_BFU
The following problems were addressed:
Communication capabilities of the Arduino ESP32 modules;
How to connect an IoT to a database;
What is Adafruit IO;
Adafruit IO Registration;
How to create an IoT that sends data to an Adafruit IO cloud database;
Code sizing was created;
Conclusions about the development